Estimated reading time: 8 minutes
Once you’ve understood how to use colors in your terminal, it’s super easy to use. Coloring your shell script code is almost indispensable!
I’ve tried to chew over the content as objectively as possible. I hope it’s a good starting point for you to go out and paint everything, hehe. Let’s go in parts.
Exhaust code
First of all, it is important to know that to activate the color you must use an escape code that calls the coloring function.
The code is ESC[m.
The code can be called in various ways.
According to the ascii table at man ascii:
Oct   Dec   Hex   Char
-------------------------------
033   27    1B    ESC (escape)
Personally, I like to call ESC by the octal \033.
In the new versions of bash, you can also call \e, but using hex or octal will give you less headache.
Note: decimal usually doesn’t work!
Warning: On MacOS, the latest version of bash is very old, 3.2.57. I recommend updating to version 5 with brew.
So, call the style formation function as follows (we haven’t put in any styles/colors yet):
echo -e "\033[m" Texto pronto para receber cores. Escape em octal
echo -e "\x1b[m" Outro texto sem cores. Escape em hexadecimal
Formatting
So let’s start coloring. Basically we have to deal with 3 characteristics of formatting. They are:
- Text decoration effect
- Text color (foreground)
- Background color
Each of these characteristics has a unique code, which will be seen below.
Decoration
The table below should work for all color modes, but not always for all terminals. Each terminal has its own peculiarities.
Código  | Descrição
------- | -----------
0       | Reset/Normal
1       | Bold text
2       | Dim (escurece)
3       | Italics
4       | Underlined text
5       | Blink
7       | Reverse
8       | Hidden
9       | Tachado
Apply the code between ESC[ and m.
After each piece of colored text, reset it (0) with ESC[0m, or simply omit any code, leaving ESC[m.
echo -e "\033[1m" Com negrito. "\033[m" Texto normal.
echo -e "\033[1m" Com negrito. "\033[m" Texto normal.
You can also combine formatting by separating the codes with the ;
echo -e "\033[1;3m" Negrito e itálico. "\033[0m" Texto normal.
Using printf, the syntax changes a little, but it’s just as simple. It is divided into 2 parts: formatting, where you define details about the type (text, number, color codes, etc.) and arguments, where you enter the information that will receive the formatting. See the examples:
printf '\033[1;3m %s \033[0m' "Texto decorado."
printf '\033[48;2;255;255;255;38;2;255;0;255m %3d \033[0m %s \033[1;4;31m %3d \033[0m' 100 "Texto sem cor:" 3
Note: For didactic purposes, the printf formatting is enclosed in single quotation marks ‘ ‘, and the arguments follow.
Color modes
Then things get more complex, as each terminal can read in a different way. From one terminal to another, there may be support for more or fewer color modes. On MacOS, iTerm 2 is a good choice, even with window dividers, which is very interesting for those who spend all day working in the terminal. However, the standard MacOS Terminal shouldn’t hinder you in this regard. A colleague patiently put together this interesting compatibility table.
There are 4 color modes:
- Pure ASCII
- ANSI escape codes: 16 color codes with bold/italics and background
- 256 colors: 216 colors + 16 ANSI + 24 gray (24-bit colors)
- 24-bit true color: “8 8 8” or “11111111 11111111 11111111” colors (16 million colors)
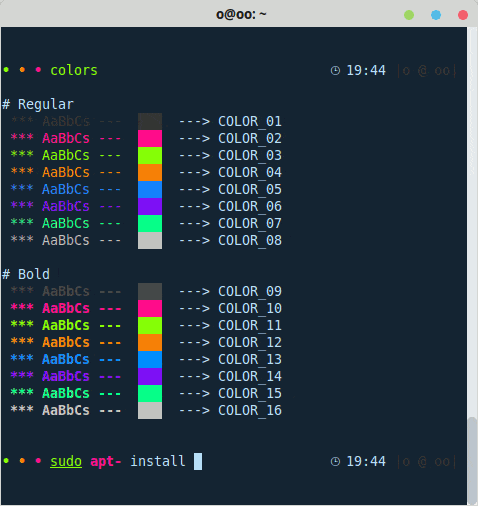
8/16 color mode
As mentioned above, each color has a unique code. In this mode, the colors that will change the text have codes “3x” and “9x” and the colors that change the background start with “4x” and “10x”. See the table
Color           | Foreground Code   | Background Code
--------------- | ----------------- | --------------
Default Color   | 39                | 49
Black           | 30                | 40
Red             | 31                | 41
Green           | 32                | 42
Yellow          | 33                | 43
Blue            | 34                | 44
Magenta         | 35                | 45
Cyan            | 36                | 46
Light Gray      | 37                | 47
Gray            | 90                | 100
Light Red       | 91                | 101
Light Green     | 92                | 102
Light Yellow    | 93                | 103
Light Blue      | 94                | 104
Light Magenta   | 95                | 105
Light Cyan      | 96                | 106
White           | 97                | 107
For this mode, the code syntax can follow this pattern ESC[E;F;BmE can be several decoration codes.
Código  | Descrição
------- | ---------
ESC[    | Sequência de escape para iniciar cores
E       | Código de efeito.
F       | Código da cor do texto; um valor de 30 à 37.
B       | Código de cor de fundo; um valor de 40 à 47.
m       | Representa o fim da sequência de cores.
The order of the code doesn’t matter either.
Examples:
echo -e "\033[1;92;104m Texto verde claro em negrito com fundo azul claro \033[m"
echo -e "\033[5;3;31;107m Texto vermelho, piscante, itálico com fundo branco \033[m"
echo -e "\033[4;90m Texto cinza, sobrescrito\033[m"
echo -e "\033[1;5m Bold+Blink \033[0m"
echo -e "\033[1;4;31m Bold+Underline+Red \033[0m"
The color code can also be entered in variables:
# Seta cores
RED='\033[0;31m'
HEADER='\033[95m'
OKBLUE='\033[94m'
OKGREEN='\033[92m'
WARNING='\033[93m'
FAIL='\033[91m'
BOLD='\033[1m'
UNDERLINE='\033[4m'
ENDC='\033[0m'

echo -e "${RED}LINHA COM CORES${ENDC}"
echo -e "${HEADER}LINHA COM CORES${ENDC}"
echo -e "${OKBLUE}LINHA COM CORES${ENDC}"
echo -e "${OKGREEN}LINHA COM CORES${ENDC}"
echo -e "${WARNING}LINHA COM CORES${ENDC}"
echo -e "${FAIL}LINHA COM CORES${ENDC}"
echo -e "${BOLD}LINHA COM CORES${ENDC}"
echo -e "${UNDERLINE}LINHA COM CORES${ENDC}"
88/256 color mode
To activate the 88/256 color mode for text, background or both, it’s a bit different. The code combination is with 2 different sequences:
- To set the color of the text, the code is 38;5;{0..255}, where {0..255} is one of the 256 colors
- To set the color on the background, the code is 48;5;{0..255}
See the full list of 256 colors and their combinations with text/background color by running this shell script:
#!/bin/bash

# This program is free software. It comes without any warranty, to
# the extent permitted by applicable law. You can redistribute it
# and/or modify it under the terms of the Do What The Fuck You Want
# To Public License, Version 2, as published by Sam Hocevar. See
# http://sam.zoy.org/wtfpl/COPYING for more details.

for fgbg in 38 48 ; do # Foreground / Background
    for color in {0..255} ; do # Colors
        # Display the color
        printf "\e[${fgbg};5;%sm  %3s  \e[0m" $color $color
        # Display 6 colors per lines
        if [ $((($color + 1) % 6)) == 4 ] ; then
            echo # New line
        fi
    done
    echo # New line
done
In this case, you need to follow the order in which the trio is combined, unlike the 8/16 color mode above. But it doesn’t matter whether you put the background before the foreground or vice versa. You just can’t do something like 5;{0..255};38, otherwise it’ll be bad.
See how the combination of text colors, background and decoration looks:
# Recapitulando:
# ESC[...m <- identifica o uso de cor
# \033 <- escape
# 38;5;cor <- Cor do texto
# 48;5;cor <- Cor do fundo
# 0 a 9 <- estilo

echo -en "\033[38;5;135;48;5;114;3m Fundo verde e texto rosa itálico \033[m"
echo -en "\033[48;5;135;38;5;235;1m Fundo rosa e texto preto negrito \033[m"
24-bit true color mode (16 million colors)
The syntax for using 24-bit mode is not very different from the previous one. The detail here is the presence of R;G;B:
ESC[{38|48};2;${red};${green};${blue}m
Examples:
# Cor do texto
echo -e "\033[38;2;255;0;255mTRUECOLOR\033[0m\n";

# Cor do fundo
echo -e "\033[48;2;255;255;255mTRUECOLOR\033[0m\n";

# Cor do texto e do fundo
echo -e "\033[48;2;255;255;255;38;2;255;0;255mTRUECOLOR\033[0m\n";

# Cor texto, fundo e estilo
echo -e "\033[48;2;255;255;255;38;2;255;0;255;3mTRUECOLOR\033[0m\n"
Look how interesting these background gradients are.
for i in {16..20} {20..16} ; do echo -e "\033[48;5;${i};1m :o) \033[0m" ; done
for i in {22..27} {27..22} ; do echo -en "\033[48;5;${i};1m \033[0m" ; done
Final considerations
As you can see, it’s not complicated. You just need to know how to use the correct color mode and get the escape code right.
For this article, we used the command echo a lot, with its argument -e, which allows the use of special characters with escape.
But you can also use printf without any problem if you need the tool’s advanced functions.
To find out more about echoread the command manual, which is very easy to understand.
man echo
Printf is a little more complex, but very interesting. It’s worth it.
man printf
I hope you enjoyed it.
Questions? Leave a comment.
See also
- tput http://linuxcommand.org/lc3_adv_tput.php for terminal manipulations
- Color section supported by “bash tips” from https://misc.flogisoft.com/bash/tip_colors_and_formatting
- https://gist.github.com/XVilka/8346728